
You should be experienced in Paint Shop Pro to do this tutorial. This was made with PSP X2 but should be able to be used with any version PSP.
This tutorial should be used as a guideline, do your own take on it and have fun with it.
Supplies:
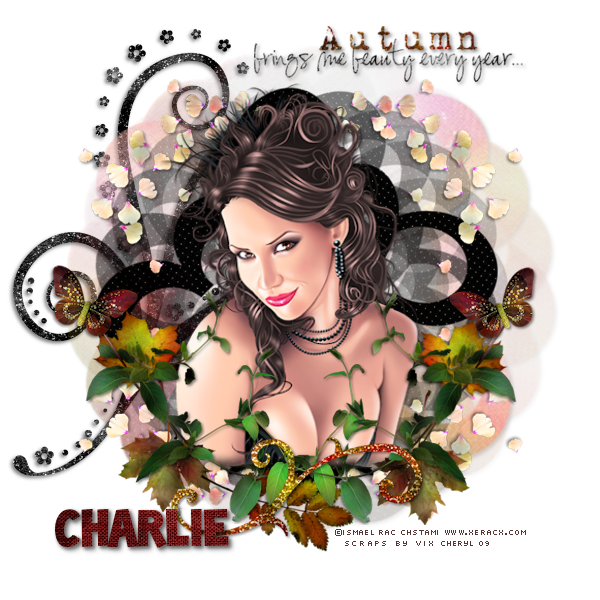
I used a gorgeous tube by Ismael Rac which you can purchase here .
I have used the beautiful Autumn Song FTU scrapkit by Vix and you can find it here .
I used Vix’s Mask 232 that you can grab here .
Let’s get started!
Open a blank tag 600 x 600 and flood fill the bottom layer white so you can see the tag better.
Open a new layer and fill with black. Apply Vix mask 232 and merge group.
Click on bottom white layer and paste as new layer paper 11, apply Vix Mask 232 and grab the corners and enlarge to peek out from behind the black mask. Image, Free Rotate 45 degrees and lower the opacity to 50%.
Open, copy and place the petals in upper left corner, do a drop shadow of 2-2-50-5.
Right click and duplicate the petals, then Image, Mirror and merge down. Duplicate again and go to Image, flip. Merge down. Drop shadow as above.
Next, paste the tube of your choice and move to center of mask. Take the selection tool to draw a narrow rectangle with 15% feather at the very bottom and hit delete to blend/fade better.
RESIZE IMAGE TO 600 X 600 now.
Next, open, copy the Leaves1, and paste as a new layer, then duplicate, mirror and arrange below tube. Drop shadow as above.
Open, copy and paste leaf 2 as new layer. Image, Flip and add below the leaves, duplicate and arrange on each side on bottom. Open Leaf3, duplicate and aarrange on each side. (refer to my tag) Open and place Leaf1 at bottom of tag, turn so it is side ways.
Open, Resize to 60% and put a couple butterflies to cover the stems of the green leaves. Use the wordart you would like. Decorate and make it your own. I added a couple doodles for some sparkle. Make sure all layers have a drop shadow as above.
Next be sure to add copyright so it can be read clearly.
Add your name and drop shadow as above.
X out the white bottom layer and save as a png file.
All done. I hope you enjoyed this tutorial!


No comments:
Post a Comment